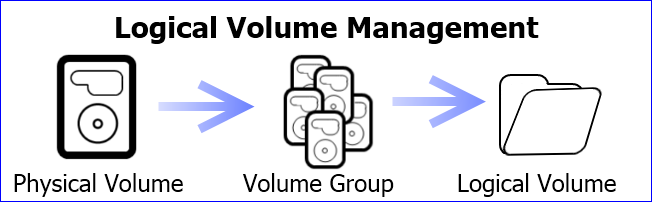
As stated before, LVM is a abstraction layer between your operating system and physical hard drives.
Most of the commands in LVM are very similar to each other.
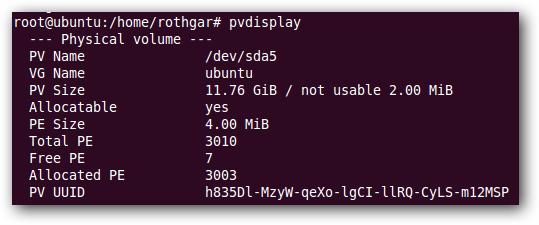
The
command will format the information so it’s easier to understand than the
command.
The most important information will be the PV name and VG name.
With those two pieces of information we can continue working on the LVM setup.
Creating a Logical Volume
Logical volumes are the partitions that your operating system uses in LVM.

To create a logical volume we first need to have a physical volume and volume group.
Here are all of the steps necessary to create a new logical volume.
Start by finding which disk you will be working with.
(/dev/sda, sdb, etc.)
This is completely fine because we are going to create the needed partitions in the next steps.
Our new disk is located at /dev/sdb so lets use fdisk to create a new partition on the drive.

From a terminal jot down the following commands:
This will put you in a special fdisk prompt.
Warning: The following steps will format your hard drive.
check that you don’t have any information on this hard drive before following these steps.

Push enter twice to accept the default first cylinder and last cylinder.
To prepare the partition to be used by LVM use the following two commands.
Verify and write the information to the hard drive.

Enter
to create a LVM physical volume on the partition we just created.
Luckily this only takes one command.
Vgpool is the name of the new volume group we created.

Vgpool is referenced so that the lvcreate command knows what volume to get the space from.
Create a mount point and then mount the volume somewhere you’re free to use it.
There are three basic tools for making physical volumes, volume groups, and logical volumes bigger or smaller.
Then use pvcreate to create a physical volume that LVM can recognize.
This will add the new physical volume to the existing volume group.
In our example we just added a 8 GB hard drive to our 3 GB vgpool.

To make that space usable we can use lvextend or lvresize.
To add the last 3 available gigabytes you better use the following command.
Now our logical volume is 11 GB in size.

To make the file system use the entire 11 GB available you have to use the command resize2fs.
Just point resize2fs to the 11 GB logical volume and it will do the magic for you.
Note: If you are using a different file system besides ext3/4 like see your file systems resize tools.

Here we created a logical volume with only 512 MB because the drive isn’t being actively used.
The 512 MB will store any new writes while we make our backup.
For help with the tar command use
in the terminal.

check that you have enough free space while the backup is happening.
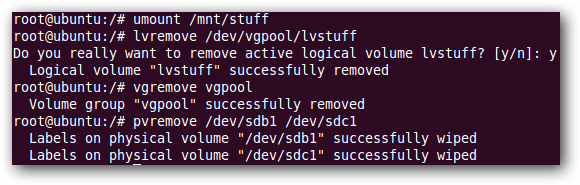
Once the backup finishes, unmount the volume and remove the temporary snapshot.
Here are all the commands using the volumes and groups we’ve created.

Linux Commands
Files
tarpvcattacchmodgrepdiffsedarmanpushdpopdfscktestdiskseqfdpandoccd$PATHawkjoinjqfolduniqjournalctltailstatlsfstabecholesschgrpchownrevlookstringstyperenamezipunzipmountumountinstallfdiskmkfsrmrmdirrsyncdfgpgvinanomkdirdulnpatchconvertrcloneshredsrmscpgzipchattrcutfindumaskwctr
Processes
aliasscreentopnicereniceprogressstracesystemdtmuxchshhistoryatbatchfreewhichdmesgchfnusermodpschrootxargsttypinkylsofvmstattimeoutwallyeskillsleepsudosutimegroupaddusermodgroupslshwshutdownreboothaltpoweroffpasswdlscpucrontabdatebgfgpidofnohuppmap
Networking
netstatpingtracerouteipsswhoisfail2banbmondigfingernmapftpcurlwgetwhowhoamiwiptablesssh-keygenufwarpingfirewalld