Note: You will need to install VirtualBox on a 64-bit Windows System that supports hardware virtualization.
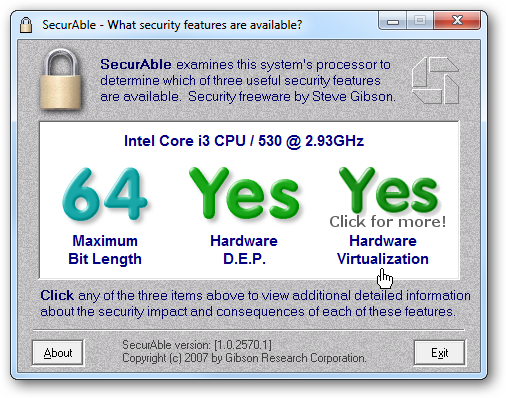
For best results double-check the Host computer supports Hardware Virtualization.
Installation is straight-forward choosing the defaults.
During the installation select Yes to the warning about online grid Interfaces.
You’ll be prompted to approve the install of the equipment software, click Install.
Setup Your New VM
Now that we have VirtualBox installed it’s time to create our VM for Vail.
![sshot-2010-08-12-[04-03-25]](https://static1.howtogeekimages.com/wordpress/wp-content/uploads/2010/08/sshot20100812040325.png)
From the main interface choose New to begin the New Machine Wizard.
go for the amount of memory you want to use.
The minimum is 1GB but here we’re bumping it up to 2GB.
![sshot-2010-08-12-[04-04-16]](https://static1.howtogeekimages.com/wordpress/wp-content/uploads/2010/08/sshot20100812040416.png)
We actually tried it both ways and they worked equally.
opt for size of your disk where the minimum is 160GB.
Since we picked Dynamically Expanding storage, it won’t take up the full 160GB on the disk.
![sshot-2010-08-12-[04-16-04]](https://static1.howtogeekimages.com/wordpress/wp-content/uploads/2010/08/sshot20100812041604.png)
Review your new machine summary and tap on Finish.
It’s a server and not meant to be fancy.
The web link prefs are probably the most important as they are in the VMware installs.
![sshot-2010-08-12-[04-18-16]](https://static1.howtogeekimages.com/wordpress/wp-content/uploads/2010/08/sshot20100812041816.png)
Check Enable web connection Adapter and change it to Bridged Adapter.
This will make the Vail VM appear as a separate machine on your internet.
Under Storage for the CD/DVD gadget browse to your VailInstallDVD.iso image.
![sshot-2010-08-12-[19-26-23]](https://static1.howtogeekimages.com/wordpress/wp-content/uploads/2010/08/sshot20100812192623.png)
Also, check that to move the CD/DVD-ROM up to first in the Boot Order.
Now startup your new Vail VM and go through theVail Installation Process.
tap on Devices \ Install Guest Additions.
![sshot-2010-08-12-[04-19-33]](https://static1.howtogeekimages.com/wordpress/wp-content/uploads/2010/08/sshot20100812041933.png)
When AutoPlay starts in the VM select Run VBoxWindowsAdditions.exe.
Then navigate through the VirtualBox Guest Additions Setup Wizard.
After working through the Guest Additions Install Wizard, a reboot of your Vail VM will be required.
![sshot-2010-08-12-[04-20-33]](https://static1.howtogeekimages.com/wordpress/wp-content/uploads/2010/08/sshot20100812042033.png)
When it comes back from reboot, at the CTRL+ALT+DEL logon screen go to Machine \ Insert Ctrl+Alt+Del.
Now you’re able to log into Vail.
That is all there is to it!
![sshot-2010-08-12-[19-38-55]](https://static1.howtogeekimages.com/wordpress/wp-content/uploads/2010/08/sshot20100812193855.png)
you’re free to now start using your Virtual Vail machine in VirtualBox.
Download VirtualBox
Download Windows Home Server Vail Beta from Microsoft Connect– Registration Required.
![sshot-2010-08-12-[04-21-07]](https://static1.howtogeekimages.com/wordpress/wp-content/uploads/2010/08/sshot20100812042107.png)
![sshot-2010-08-12-[04-21-50]](https://static1.howtogeekimages.com/wordpress/wp-content/uploads/2010/08/sshot20100812042150.png)
![sshot-2010-08-12-[04-22-18]](https://static1.howtogeekimages.com/wordpress/wp-content/uploads/2010/08/sshot20100812042218.png)
![sshot-2010-08-12-[04-24-49]](https://static1.howtogeekimages.com/wordpress/wp-content/uploads/2010/08/sshot20100812042449.png)
![sshot-2010-08-12-[04-25-38]](https://static1.howtogeekimages.com/wordpress/wp-content/uploads/2010/08/sshot20100812042538.png)
![sshot-2010-08-12-[04-29-02]](https://static1.howtogeekimages.com/wordpress/wp-content/uploads/2010/08/sshot20100812042902.png)
![sshot-2010-08-12-[21-47-37]](https://static1.howtogeekimages.com/wordpress/wp-content/uploads/2010/08/sshot20100812214737.png)
![sshot-2010-08-12-[04-44-49]](https://static1.howtogeekimages.com/wordpress/wp-content/uploads/2010/08/sshot20100812044449.png)
![sshot-2010-08-12-[05-38-33]](https://static1.howtogeekimages.com/wordpress/wp-content/uploads/2010/08/sshot20100812053833.png)
![sshot-2010-08-12-[05-39-11]](https://static1.howtogeekimages.com/wordpress/wp-content/uploads/2010/08/sshot20100812053911.png)
![sshot-2010-08-12-[05-39-51]](https://static1.howtogeekimages.com/wordpress/wp-content/uploads/2010/08/sshot20100812053951.png)
![sshot-2010-08-12-[05-41-57]](https://static1.howtogeekimages.com/wordpress/wp-content/uploads/2010/08/sshot20100812054157.png)
![sshot-2010-08-12-[05-43-58]](https://static1.howtogeekimages.com/wordpress/wp-content/uploads/2010/08/sshot20100812054358.png)
![sshot-2010-08-12-[05-44-35]](https://static1.howtogeekimages.com/wordpress/wp-content/uploads/2010/08/sshot20100812054435.png)
![sshot-2010-08-12-[16-56-12]](https://static1.howtogeekimages.com/wordpress/wp-content/uploads/2010/08/sshot20100812165612.png)
