Here we show you a few different ways to everything from one computer to another.
It also makes it easy to transfer your iTunes collection to another machine.
This is probably one of the easiest ways to transfer everything over to a new machine.
To use the Home Sharing feature you’ll need iTunes 9 installed on both computers.
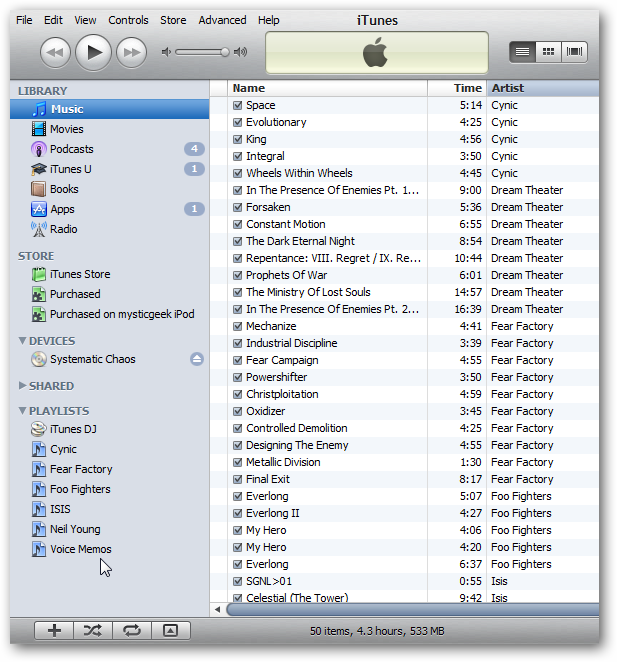
Here we take a look at the first machine with its iTunes Library.
Open iTunes and select Home Sharing on the left side of iTunes under Shared.
![sshot-2010-08-12-[23-28-29]](https://static1.howtogeekimages.com/wordpress/wp-content/uploads/2010/08/sshot20100812232829.png)
If you don’t see it go to Advanced and select Enable Home Sharing.
Next you’ll be prompted to drop your iTunes Store account to use Home Sharing.
Then poke the Create Home Share button.
![sshot-2010-08-28-[00-25-23]](https://static1.howtogeekimages.com/wordpress/wp-content/uploads/2010/08/sshot20100828002523.png)
You will need to set this up on all computers you want to share your iTunes media with.
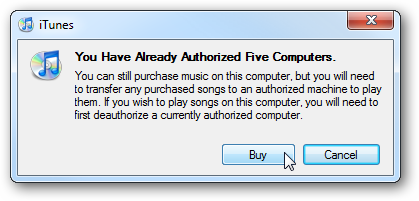
Keep in mind that iTunes only lets you authorize up to 5 machines.
To solve the problem check out our article on how todeauthorize computers associated with your iTunes Account.
![sshot-2010-08-28-[00-26-53]](https://static1.howtogeekimages.com/wordpress/wp-content/uploads/2010/08/sshot20100828002653.png)
Apple lets you deauthorize all 5 machines through your account once a year.
Then if you quit, the other machine will no longer have access to the first machine’s media.
To do that there are a few different ways to go about it.
![sshot-2010-08-28-[00-38-01]](https://static1.howtogeekimages.com/wordpress/wp-content/uploads/2010/08/sshot20100828003801.png)
For instance, here we want to move a Playlist to the new computer.
You’ll see the progress while all the files are transferred from the old machine to the new one.
In this example we transferred all of our apps.
![sshot-2010-08-28-[01-46-34]](https://static1.howtogeekimages.com/wordpress/wp-content/uploads/2010/08/sshot20100828014634.png)
And there you go… all your apps have been transferred to the second machine.
Just opt for first computers Shared Library, hit Ctrl+A to highlight everything then poke the Import button.
Then wait while everything transfers.
![sshot-2010-08-28-[01-46-54]](https://static1.howtogeekimages.com/wordpress/wp-content/uploads/2010/08/sshot20100828014654.png)
If you have a large collection it can take several minutes so your mileage will vary.
Then plug the iPod into your new machine.
iTunes should launch and you’re free to select to Erase and Sync or Transfer Purchases.
Here we want to erase the contents of the new machine and transfer our iPod data.
You’ll get a second message asking if you’re sure…click Transfer.
Now everything from the iPod will be transferred to your new computer.
![sshot-2010-08-29-[17-06-10]](https://static1.howtogeekimages.com/wordpress/wp-content/uploads/2010/08/sshot20100829170610.png)
First let’s take a look at copying and moving your collection with an external USB drive.
This will decrease the size of your collection and make the copying process to the external drive easier.
Where “computer name” is the name of your machine.
![sshot-2010-08-28-[01-50-52]](https://static1.howtogeekimages.com/wordpress/wp-content/uploads/2010/08/sshot20100828015052.png)
Then just copy over the entire iTunes folder onto the external drive and wait for everything to copy over.
The amount of time it takes will depend on the amount of data you’re moving.
Unplug the USB drive and plug it into the second computer.
![sshot-2010-08-28-[02-25-19]](https://static1.howtogeekimages.com/wordpress/wp-content/uploads/2010/08/sshot20100828022519.png)
Since you already have iTunes installed on the second machine, click yes to replacing the folder.
Then wait for the folder to be copied over.
This will let you choose where to load your Library from.
![sshot-2010-08-28-[02-25-54]](https://static1.howtogeekimages.com/wordpress/wp-content/uploads/2010/08/sshot20100828022554.png)
Now navigate to the iTunes Library.itl file from the iTunes folder you just copied over.
Then you don’t need to copy anything to your local My Music folder.
Now you’ll have all of your contents including Apps, Music, Playlists…etc.
![sshot-2010-08-28-[03-54-54]](https://static1.howtogeekimages.com/wordpress/wp-content/uploads/2010/08/sshot20100828035454.png)
in iTunes on the second machine all running from the external drive.
Like in this example it can’t find the band Cynic’s music.
So we went ahead and browsed to the location of the song.
![sshot-2010-08-28-[03-49-52]](https://static1.howtogeekimages.com/wordpress/wp-content/uploads/2010/08/sshot20100828034952.png)
Then iTunes offered to find other missing songs from that directory.
So at least it makes it easier to find the missing songs than adding each one manually.
It’s very easy to use and requires no installation.
![sshot-2010-08-28-[03-39-11]](https://static1.howtogeekimages.com/wordpress/wp-content/uploads/2010/08/sshot20100828033911.png)
Again for this method we’ll use an external hard drive.
This will be needed while setting up Library Mover.
Go to File \ Library \ Export Library.
![sshot-2010-08-28-[03-39-39]](https://static1.howtogeekimages.com/wordpress/wp-content/uploads/2010/08/sshot20100828033939.png)
Then navigate to a location on your external drive to backup the default library.xml.
Then download and extract the zip file it to a convenient location on your setup and launch iTunesLibraryMover.exe.
Then confirm to check Copy Files and click Go.
![sshot-2010-08-28-[03-41-28]](https://static1.howtogeekimages.com/wordpress/wp-content/uploads/2010/08/sshot20100828034128.png)
Then wait while everything is copied over…
When it’s complete you’ve got the option to close out of it.
And a new library.xml file as well.
![sshot-2010-08-28-[04-28-35]](https://static1.howtogeekimages.com/wordpress/wp-content/uploads/2010/08/sshot20100828042835.png)
Now that has completed, plug the external drive into your new computer.
Open iTunes and go to File \ Library \ Import Playlist.
Browse to the new Library.xml file that was created on the external drive.
![sshot-2010-08-29-[17-14-22]](https://static1.howtogeekimages.com/wordpress/wp-content/uploads/2010/08/sshot20100829171422.png)
Then wait while everything is imported…
This did a good job of transferring our purchased music, playlists, podcasts, and video files.
However it didn’t transfer Apps or iBooks.
![sshot-2010-08-28-[04-29-06]](https://static1.howtogeekimages.com/wordpress/wp-content/uploads/2010/08/sshot20100828042906.png)
The process may sound a bit complicated but it really isn’t when you use it.
![sshot-2010-08-28-[04-37-28]](https://static1.howtogeekimages.com/wordpress/wp-content/uploads/2010/08/sshot20100828043728.png)
![sshot-2010-08-29-[17-45-57]](https://static1.howtogeekimages.com/wordpress/wp-content/uploads/2010/08/sshot20100829174557.png)
![sshot-2010-08-29-[17-57-00]](https://static1.howtogeekimages.com/wordpress/wp-content/uploads/2010/08/sshot20100829175700.png)
![sshot-2010-08-29-[18-11-28]](https://static1.howtogeekimages.com/wordpress/wp-content/uploads/2010/08/sshot20100829181128.png)
![sshot-2010-08-29-[17-59-52]](https://static1.howtogeekimages.com/wordpress/wp-content/uploads/2010/08/sshot20100829175952.png)
![sshot-2010-08-29-[02-54-33]](https://static1.howtogeekimages.com/wordpress/wp-content/uploads/2010/08/sshot20100829025433.png)
![sshot-2010-08-28-[22-51-16]](https://static1.howtogeekimages.com/wordpress/wp-content/uploads/2010/08/sshot20100828225116.png)
![sshot-2010-08-28-[23-15-09]](https://static1.howtogeekimages.com/wordpress/wp-content/uploads/2010/08/sshot20100828231509.png)
![sshot-2010-08-28-[23-25-42]](https://static1.howtogeekimages.com/wordpress/wp-content/uploads/2010/08/sshot20100828232542.png)
![sshot-2010-08-28-[23-26-19]](https://static1.howtogeekimages.com/wordpress/wp-content/uploads/2010/08/sshot20100828232619.png)
![sshot-2010-08-28-[23-26-44]](https://static1.howtogeekimages.com/wordpress/wp-content/uploads/2010/08/sshot20100828232644.png)
![sshot-2010-08-28-[23-28-45]](https://static1.howtogeekimages.com/wordpress/wp-content/uploads/2010/08/sshot20100828232845.png)
![sshot-2010-08-28-[23-32-50]](https://static1.howtogeekimages.com/wordpress/wp-content/uploads/2010/08/sshot20100828233250.png)
![sshot-2010-08-28-[23-33-32]](https://static1.howtogeekimages.com/wordpress/wp-content/uploads/2010/08/sshot20100828233332.png)
![sshot-2010-08-29-[00-38-34]](https://static1.howtogeekimages.com/wordpress/wp-content/uploads/2010/08/sshot20100829003834.png)
![sshot-2010-08-29-[00-52-41]](https://static1.howtogeekimages.com/wordpress/wp-content/uploads/2010/08/sshot20100829005241.png)
![sshot-2010-08-29-[00-53-20]](https://static1.howtogeekimages.com/wordpress/wp-content/uploads/2010/08/sshot20100829005320.png)
![sshot-2010-08-28-[23-37-40]](https://static1.howtogeekimages.com/wordpress/wp-content/uploads/2010/08/sshot20100828233740.png)
![sshot-2010-08-29-[00-32-53]](https://static1.howtogeekimages.com/wordpress/wp-content/uploads/2010/08/sshot20100829003253.png)
![sshot-2010-08-29-[03-02-26]](https://static1.howtogeekimages.com/wordpress/wp-content/uploads/2010/08/sshot20100829030226.png)
![sshot-2010-08-29-[01-26-20]](https://static1.howtogeekimages.com/wordpress/wp-content/uploads/2010/08/sshot20100829012620.png)
![sshot-2010-08-29-[01-34-26]](https://static1.howtogeekimages.com/wordpress/wp-content/uploads/2010/08/sshot20100829013426.png)
![sshot-2010-08-29-[03-11-49]](https://static1.howtogeekimages.com/wordpress/wp-content/uploads/2010/08/sshot20100829031149.png)
![sshot-2010-08-29-[03-13-13]](https://static1.howtogeekimages.com/wordpress/wp-content/uploads/2010/08/sshot20100829031313.png)
![sshot-2010-08-29-[04-38-09]](https://static1.howtogeekimages.com/wordpress/wp-content/uploads/2010/08/sshot20100829043809.png)
![sshot-2010-08-29-[15-53-55]](https://static1.howtogeekimages.com/wordpress/wp-content/uploads/2010/08/sshot20100829155355.png)
![sshot-2010-08-29-[16-34-04]](https://static1.howtogeekimages.com/wordpress/wp-content/uploads/2010/08/sshot20100829163404.png)
![sshot-2010-08-29-[04-19-49]](https://static1.howtogeekimages.com/wordpress/wp-content/uploads/2010/08/sshot20100829041949.png)
![sshot-2010-08-29-[16-36-15]](https://static1.howtogeekimages.com/wordpress/wp-content/uploads/2010/08/sshot20100829163615.png)
![sshot-2010-08-29-[16-38-13]](https://static1.howtogeekimages.com/wordpress/wp-content/uploads/2010/08/sshot20100829163813.png)
![sshot-2010-08-29-[16-42-27]](https://static1.howtogeekimages.com/wordpress/wp-content/uploads/2010/08/sshot20100829164227.png)
![sshot-2010-08-29-[16-42-13]](https://static1.howtogeekimages.com/wordpress/wp-content/uploads/2010/08/sshot20100829164213.png)
![sshot-2010-08-29-[16-18-47]](https://static1.howtogeekimages.com/wordpress/wp-content/uploads/2010/08/sshot20100829161847.png)
![sshot-2010-08-29-[16-46-22]](https://static1.howtogeekimages.com/wordpress/wp-content/uploads/2010/08/sshot20100829164622.png)
![sshot-2010-08-29-[16-47-09]](https://static1.howtogeekimages.com/wordpress/wp-content/uploads/2010/08/sshot20100829164709.png)
![sshot-2010-08-29-[16-50-27]](https://static1.howtogeekimages.com/wordpress/wp-content/uploads/2010/08/sshot20100829165027.png)

