Previously we showed youhow to install WHS Vail on VMware Workstation.
Like SecurAble it doesn’t require installation, just launch the executable as Administrator.
Showing either that you’re machine is capable of Hardware Virtualation or not.
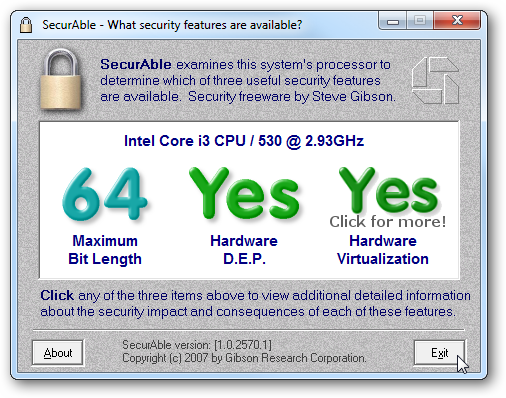
If that doesn’t work, see to it you have the latest update for your BIOS.
It’s free, but registration is required (link below).
Now you’ll be able to access VMware Server from the Start Menu along with other tools it provides.
![sshot-2010-07-26-[20-02-11]](https://static1.howtogeekimages.com/wordpress/wp-content/uploads/2010/07/sshot20100726200211.png)
To launch it, press VMware Server Home Page which will launch locally in your default online window.
This next step is pretty important.
You’ll notice that during the installation you were never asked to enter in user credentials.
![sshot-2010-07-26-[20-03-00]](https://static1.howtogeekimages.com/wordpress/wp-content/uploads/2010/07/sshot20100726200300.png)
By default it uses the login information for the machine you’re running it on.
Not your VMware login information.
Once logged in you will be presented with the summary page.
![sshot-2010-07-26-[20-07-28]](https://static1.howtogeekimages.com/wordpress/wp-content/uploads/2010/07/sshot20100726200728.png)
Now we’re ready to install Windows Home Server “Vail”!
tap on Virtual Machine \ Create Virtual machine.
The Create Virtual Machine wizard starts and first you want to give it a name.
![sshot-2010-07-25-[02-08-22]](https://static1.howtogeekimages.com/wordpress/wp-content/uploads/2010/07/sshot20100725020822.png)
Next we need to grab the Guest Operating System.
From the Version dropdown field select Microsoft Windows Server 2008 (64-bit).
Now opt for amount of memory you want the server to use.
![sshot-2010-07-25-[03-33-04]](https://static1.howtogeekimages.com/wordpress/wp-content/uploads/2010/07/sshot20100725033304.png)
Since our machine has extra memory, we bumped it up to 2GB.
In the next step we need to Create a new Virtual Disk.
Now we need to assign its capacity.
![sshot-2010-07-25-[05-21-45]](https://static1.howtogeekimages.com/wordpress/wp-content/uploads/2010/07/sshot20100725052145.png)
The minimum size for Vail is 160GB so we will just go with that.
In our testing we’ve had best result by checking Allocate all disk space now.
Next under data pipe Adapter tap on Add a data pipe Adapter…
![sshot-2010-07-25-[05-29-42]](https://static1.howtogeekimages.com/wordpress/wp-content/uploads/2010/07/sshot20100725052942.png)
Under Properties you’ll have best results if you use a Bridged internet Connection.
The browse feature in VMware Server doesn’t allow browsing to you local directories like Workstation or Player.
For the CD/DVD Drive select Use an ISO Image (which is the format Vail downloads as).
![sshot-2010-07-26-[19-04-51]](https://static1.howtogeekimages.com/wordpress/wp-content/uploads/2010/07/sshot20100726190451.png)
You don’t need to burn it to disc first…unless you want to for some reason.
Of course you’ll want to burn it to disc if you were installing it on an actual machine.
For our testing purposes we’re going to go ahead and click Add a USB Controller.
![sshot-2010-07-26-[19-15-26]](https://static1.howtogeekimages.com/wordpress/wp-content/uploads/2010/07/sshot20100726191526.png)
Now we’re done setting up the VM.
Check out the overview and verify it’s configured correctly.
If not you’ve got the option to go back at this point and make adjustments.
![sshot-2010-07-26-[19-18-30]](https://static1.howtogeekimages.com/wordpress/wp-content/uploads/2010/07/sshot20100726191830.png)
Remember we can change the tweaks after Vail is install as well.
Check Power on your new virtual machine now and poke the Finish button.
Now wait while your new Virtual Server will be built.
![sshot-2010-07-26-[19-40-59]](https://static1.howtogeekimages.com/wordpress/wp-content/uploads/2010/07/sshot20100726194059.png)
The length of time it takes will vary based on the throw in of hardware your machine has.
On our system it took around 30 minutes to create the virtual HD.
After installing the Plug-in you oughta restart Firefox.
![sshot-2010-07-26-[19-44-56]](https://static1.howtogeekimages.com/wordpress/wp-content/uploads/2010/07/sshot20100726194456.png)
When we came back, we weren’t able to launch the console.
It probably has something to do with an Addon or some caching issue.
We will figure out a fix and post an article about it later.
![sshot-2010-07-26-[20-13-46]](https://static1.howtogeekimages.com/wordpress/wp-content/uploads/2010/07/sshot20100726201346.png)
We want to get Vail installed so we ran the VMware Server in Internet Explorer 8 instead.
Again, you’ll need to roll out the Remote Console Plug-in.
Installation for IE is straight-forward following the install wizard.
![sshot-2010-07-26-[20-16-07]](https://static1.howtogeekimages.com/wordpress/wp-content/uploads/2010/07/sshot20100726201607.png)
The VMware Remote Console opens up and you’re free to now begin your Vail installation.
On our system, installation took around 45 minutes to complete.
During the install, the Remote Console will restart several times.
![sshot-2010-07-26-[20-19-19]](https://static1.howtogeekimages.com/wordpress/wp-content/uploads/2010/07/sshot20100726201919.png)
Over in the Remote Console you’ll see AutoPlay pop up…select Run setup.exe.
Then fire off the the install wizard accepting the defaults.
A restart of the VM Server will be required to complete the install process.
![sshot-2010-07-26-[20-22-37]](https://static1.howtogeekimages.com/wordpress/wp-content/uploads/2010/07/sshot20100726202237.png)
After you restart the VM you’ll see the Ctrl+Alt+Del screen.
select VMware Remote Console \ Troubleshoot \ Send Ctrl+Alt+Del.
Then log into your WHS Vail virtual server.
![sshot-2010-07-26-[20-24-02]](https://static1.howtogeekimages.com/wordpress/wp-content/uploads/2010/07/sshot20100726202402.png)
You will be able to RDP into it just like it was a separate physical machine on your connection.
There are still several quirks that need to be worked out with it first.
![sshot-2010-07-26-[20-27-19]](https://static1.howtogeekimages.com/wordpress/wp-content/uploads/2010/07/sshot20100726202719.png)
![sshot-2010-07-26-[20-36-15]](https://static1.howtogeekimages.com/wordpress/wp-content/uploads/2010/07/sshot20100726203615.png)
![sshot-2010-07-26-[20-29-21]](https://static1.howtogeekimages.com/wordpress/wp-content/uploads/2010/07/sshot20100726202921.png)
![sshot-2010-07-26-[20-57-54]](https://static1.howtogeekimages.com/wordpress/wp-content/uploads/2010/07/sshot20100726205754.png)
![sshot-2010-07-26-[20-59-20]](https://static1.howtogeekimages.com/wordpress/wp-content/uploads/2010/07/sshot20100726205920.png)
![sshot-2010-07-26-[21-01-10]](https://static1.howtogeekimages.com/wordpress/wp-content/uploads/2010/07/sshot20100726210110.png)
![sshot-2010-07-26-[21-02-17]](https://static1.howtogeekimages.com/wordpress/wp-content/uploads/2010/07/sshot20100726210217.png)
![sshot-2010-07-26-[21-05-06]](https://static1.howtogeekimages.com/wordpress/wp-content/uploads/2010/07/sshot20100726210506.png)
![sshot-2010-07-26-[21-07-23]](https://static1.howtogeekimages.com/wordpress/wp-content/uploads/2010/07/sshot20100726210723.png)
![sshot-2010-07-26-[21-08-56]](https://static1.howtogeekimages.com/wordpress/wp-content/uploads/2010/07/sshot20100726210856.png)
![sshot-2010-07-26-[21-26-55]](https://static1.howtogeekimages.com/wordpress/wp-content/uploads/2010/07/sshot20100726212655.png)
![sshot-2010-07-26-[21-55-05]](https://static1.howtogeekimages.com/wordpress/wp-content/uploads/2010/07/sshot20100726215505.png)
![sshot-2010-07-26-[21-55-46]](https://static1.howtogeekimages.com/wordpress/wp-content/uploads/2010/07/sshot20100726215546.png)
![sshot-2010-07-26-[21-54-47]](https://static1.howtogeekimages.com/wordpress/wp-content/uploads/2010/07/sshot20100726215447.png)
![sshot-2010-07-26-[21-56-38]](https://static1.howtogeekimages.com/wordpress/wp-content/uploads/2010/07/sshot20100726215638.png)
![sshot-2010-07-26-[21-59-22]](https://static1.howtogeekimages.com/wordpress/wp-content/uploads/2010/07/sshot20100726215922.png)
![sshot-2010-07-26-[22-09-09]](https://static1.howtogeekimages.com/wordpress/wp-content/uploads/2010/07/sshot20100726220909.png)
![sshot-2010-07-26-[22-09-22]](https://static1.howtogeekimages.com/wordpress/wp-content/uploads/2010/07/sshot20100726220922.png)
![sshot-2010-07-27-[00-30-22]](https://static1.howtogeekimages.com/wordpress/wp-content/uploads/2010/07/sshot20100727003022.png)
![sshot-2010-07-26-[22-11-22]](https://static1.howtogeekimages.com/wordpress/wp-content/uploads/2010/07/sshot20100726221122.png)
![sshot-2010-07-27-[00-37-36]](https://static1.howtogeekimages.com/wordpress/wp-content/uploads/2010/07/sshot20100727003736.png)
![sshot-2010-07-26-[22-17-04]](https://static1.howtogeekimages.com/wordpress/wp-content/uploads/2010/07/sshot20100726221704.png)
![sshot-2010-07-26-[22-36-48]](https://static1.howtogeekimages.com/wordpress/wp-content/uploads/2010/07/sshot20100726223648.png)
![sshot-2010-07-27-[00-05-00]](https://static1.howtogeekimages.com/wordpress/wp-content/uploads/2010/07/sshot20100727000500.png)
![sshot-2010-07-27-[00-45-04]](https://static1.howtogeekimages.com/wordpress/wp-content/uploads/2010/07/sshot20100727004504.png)
![sshot-2010-07-27-[00-45-32]](https://static1.howtogeekimages.com/wordpress/wp-content/uploads/2010/07/sshot20100727004532.png)
![sshot-2010-07-27-[00-46-16]](https://static1.howtogeekimages.com/wordpress/wp-content/uploads/2010/07/sshot20100727004616.png)
![sshot-2010-07-27-[00-46-53]](https://static1.howtogeekimages.com/wordpress/wp-content/uploads/2010/07/sshot20100727004653.png)
![sshot-2010-07-27-[00-48-06]](https://static1.howtogeekimages.com/wordpress/wp-content/uploads/2010/07/sshot20100727004806.png)
![sshot-2010-07-27-[00-59-51]](https://static1.howtogeekimages.com/wordpress/wp-content/uploads/2010/07/sshot20100727005951.png)
![sshot-2010-07-27-[00-50-05]](https://static1.howtogeekimages.com/wordpress/wp-content/uploads/2010/07/sshot20100727005005.png)
![sshot-2010-07-27-[01-00-22]](https://static1.howtogeekimages.com/wordpress/wp-content/uploads/2010/07/sshot20100727010022.png)
![sshot-2010-07-27-[01-13-13]](https://static1.howtogeekimages.com/wordpress/wp-content/uploads/2010/07/sshot20100727011313.png)
